
A Shop Tip & A Door Model
/Shop Tip
During the construction of a project there is often a need for organizing and storing parts. This is obvously a temporary need because as the work progresses, you construct parts and then assemble them.
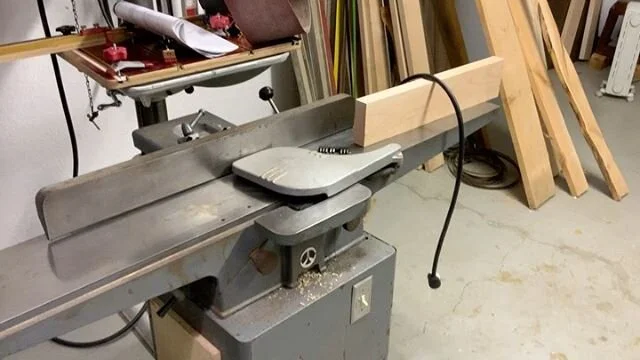
I like to use a 4' scaffold as a mobile cart to store and organize the parts that I have made.
 Using 4' scaffold as a mobile parts cart.
I bought my scaffold for $99 although I have noticed that the price has risen on them over the last couple of years. It comes with steel platform shelves to stand on and I used plywood to make more shelves. If it is not in use and I need more room, the shelves are removed so it can be folded and put in the storage room.
There are some nice storage carts on the market but I can still use this on a remodeling job as a scaffold. So it serves a dual purpose as it works well in the shop and in the field.
Designing & Project Modeling
I see a lot of discussions online about how to model and when it is appropriate. There are articles that describe a romantic process of applying the formulas for determining proportion, balancing that with artistic expression, and topping it off with a little social sophistication.
I do model work quite frequently for my projects and it is a function that seems rather pedestrian and normal in my shop.
I am currently working on some rustic cabinetry that is being constructed from doug fir beams, these were left over from the construction of a timber frame home (See previous entries to find out more.) I did the drawings in SketchUp and they looked pretty good.
 SketchUp detail of cabinet doors.
However, I did have some reservations. One thought was that the rail on the bottom of the upper cabinets looked a little narrow. I also wanted to confirm the placement of the middle rail which separate the upper and lower panels.The best way to confirm the design was to make a full scale model.
The thing to remember with a model, is just that - it is a model. It is not necessary to use the intended or traditional joinery to build it, nor is it necessary to use the actual material. It can be hot glued, super glued (cyanoacrylate), stapled together out of cardboard, styrofoam, or any inexpensive material to create a representation in form.
In this case I used the actual stock because I wanted to see how the material I am using would handle. To date it has been giving me fits that at times just kills me.
For this model, I cut the pieces to the exact width and length so that I could arrange them on the table. This allowed me to see the outside dimension and play with the negative space, that would be where the panels go, by moving the middle rail into a location that "felt" right visually. This confirmed that the best location for it was where I had placed it in the SketchUp drawing.
The real quesion in my mind was about the bottom rail. I was not sure that it actually was wide enough to be properly in balance and proportioned to the overall width and height. There seemed to be no exact answer on this matter, but there was a range of acceptability.
My original drawing started out with a 3 1/2" wide bottom rail.
 3 1/2" bottom rail just a bit small.
You will notice in the photo above that there are three more blocks of wood laying next to the door model. By adding each one I could make the rail 4 1/4", 4 1/2". or 5" wide.
The 3 1/2" rail felt narrow so I decided to go to the far end of the range of acceptability. I tried 5 1/2" but that was a bit too wide, so I immediately cut it down to 5" and it seemed that I had hit the other end of the limit pretty good.
 5" bottom rail just a bit too big.
After trying all of the sizes I decided that the 4 1/2" bottom rail felt the best. It would also work with the overall plan in consideration of the other cabinets that will be part of the project. Some of the cabinets will go floor to ceiling and they may need a larger bottom rail yet. Everything will need to tie together proportionally.
After getting the layout and component sizes confirmed, I used cyanoacrylate glue to assemble the panel frame pieces. Remember - this is a model, there is no need to use traditional joinery. However, there is value to using the intended joinery if you need to do test runs to understand the handling characteristics of the material.
 A quick assembly with cyanoacrylate.
I attached a piece of plywood to the backside and inserted some panel material that was too warped to use in the actual project. I cut the panels to drop into the frame then glued and face nailed it with the brad nailer.
 Inset panels are added to the model, they are just glued and face nailed.
Now I have an accurate representation of how the actual panels will look.
I did not need to use the actual material, but I had enough and wanted to test it's handling characteristics. I can also show the clients a picture via email or the actual panel so they can have confirmation of how it will look.
 Finished model confirms door proportions.
As you can see, models are quite often a part of the normal design process. Drawings in proportion will reveal a lot of issues with proportion and balance, but sometimes you just need the full mass of the project in front of you to make a final decision. If the project is too large, even a scale model will help.
I hope this helps you understand the function and importance of modeling. It is not just for artsy studio projects, but for common projects like cabinetry as well.
Your friend in the shop - Todd A. Clippinger
Share the Love ~ Share the Knowledge